简介

Grafana Labs开源的日志收集组件,特点有:

  • Loki 只对元数据建立索引,不做全文索引,将原始日志压缩存储在对象存储上,因此具有操作简单、低成本的优势;
  • 通过使用与 Prometheus 相同的标签对日志进行索引和分组,这使得日志的扩展和操作效率更高;
  • 专门为 Prometheus 和 Kubernetes 用户做了相关优化,更适合云原生场景。

Grafana Loki stack 主要由以下三个部分组成:

  • Grafana负责前端监控以及可视化
  • promtail负责客户端采集
  • Loki则负责了最重要的日志存储分析等功能.

架构功能及读写流程

loki-component

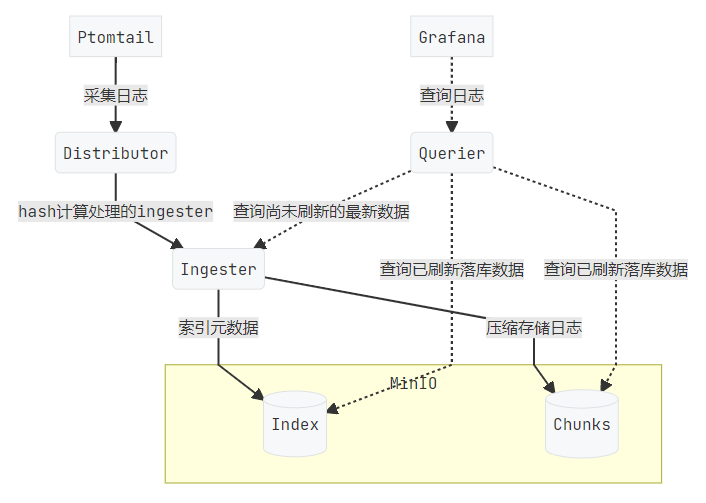
整体上来看, 采集agent(默认为promtail)会将日志推送至Loki提供的基于HTTP的API, Loki则继续将收到的日志按照标签进行分发存储, 并在需要时使用LogQL进行查询

Loki实现由众多的组件组成, 每个组件都会拉起一个gRPC的服务来实现内部互通, 同时也对外暴露了一个HTTP/1的服务用来提供外部服务以应答API请求. 不同的组件会根据角色的差异提供不同的API, 目前loki主要由以下几个组件构成

  • Distributor
  • Ingester
  • Query frontend(Optional)
  • Querier
  • Chunk Store

Distributor

主要负责分发从客户端上报的日志, 在进行完日志的校验之后便会分发给ingester处理. Distributor使用了一致性哈希以及一个可以配置的副本数来决定不同的日志流的后端ingester. 哈希环信息的存储使用了Consul. Ingester会根据自身的状态注册在哈希环上来标识自身可提供服务的状态. Distributor会使用注册租户id和标签集时作为哈希的输入, 计算出对应的哈希环位置, 并找到对应的ingester.

Ingester

Ingester是loki中比较核心的服务, 该服务将从Distributor发送来的日志进行转储到后端存储, 并给Querier提供仍在内存中未写盘的数据查询功能.

Ingester注册在哈希环上的状态有PENDING, JOINING, ACTIVE, LEAVING, UNHEALTHY, 除了ACTIVE状态外, 其余状态都只会提供部分服务

在存储到真正的存储前, 日志流只有按顺序收到才会被处理, Ingester会按照标签的组合set构建若干压缩过的chunks, 间隔一段时间将chunks作为整体刷写到后端存储. 刷进后端存储的chunks被标记为只读.

Querier Frontend

可以为查询提供加速, 他提供了排队, 切分大请求, 缓存等机制.

Querier

用来提供查询服务, 他使用了LogQL, 一种类似于PromQL的语言作为用户界面. Querier会查询已经写入后端存储的chunks以及仍在ingester内存中的数据, 根据label查找数据后, 再遍历数据查找到满足条件的日志

Chunk Store

是Loki的后端存储框架, 可以支持多种存储方式, 存储分为两部分:索引的存储和真正的日志数据存储. 索引存储目前可以使用 Amazon DynamoDB, Google Bigtable, Apsache Cassandra服务提供 日志存储使用了KV存储,目前可以使用Amazon DynamoDB, Google Bigtable, Apsache Cassandra, Amazon S3, Google Cloud Store来实现.

另外在Loki 2.0中实现了一个叫做boltdb-shipper的机制, 可以实现将索引和数据同时存在同一个对象存储仓库里. 除了使用云服务以外, Loki提供了叫做BoltDB的基于本地磁盘的数据库, 但由于副本数和锁的实现限制, 本地存储仅可在使用单进程部署时使用.

部署方式

模块设计

正因为Loki采用模块设计, Loki有很灵活的部署方式, 单模块部署或单进程部署.
单模块部署相对比较复杂, 每个模块可以单独启动, 不同的模块间通过gRPC服务互相配合提供服务.
单进程部署则是把所有的模块打包到一个二进制应用中, 通过配置文件来选择启动哪些模块, 实现了灵活方便的单机部署体验.

从运维角度来看, Loki提供了多种安装方式:

  • helm
  • docker
  • tanka
  • native

本文后端chunk存储采用minio。关于minio的部署、桶创建、权限管理不作赘述,参考Minio部署1及本地安装loki2

最终minio的信息如下:

地址:http://192.168.15.11:9000

桶名:loki

账号:loki

密码:loki123456

Loki安装-Helm方式

官方文档:官方文档

官方提供了多个Chart版本,说明如下:

  • grafana/loki:单体Loki,性能支持线性伸缩;
  • grafana/loki-stack:Loki的整套工具栈,包括loki、promtail、grafana等,缺点就是没有提供对接外部对象存储的配置;
  • grafana/loki-distributed:微服务模式的loki集群,性能上线最高,可以对各个组件(distributed、ingester、querier、frontend querier等)的副本数进行分别扩展,推荐生产环境使用。

loki-distributed部署

前提条件

因为ingester和querier均需要保留index相关信息,使用blotdb的方式进行存储,所以需要考虑持久化,通过k8s 的storageclass来进行提供。本次部署已提前部署好以nfs为基础的存储类(已配置为默认类)。

创建命名空间

kubectl create ns logging

helm添加仓库

helm repo add grafana https://grafana.github.io/helm-charts

下载Chart

# 查看helm仓库是否配置完成
helm repo list

# 下载到本地
helm pull grafana/loki-distributed

# 如因网络问题可以通过timeout信息获取需要下载的链接,使用国内代理进行下载。
# 如果连接是https://grafana.github.io/helm-charts/releases/download/loki-distributed.tar.gz,使用如下命令下载:
wget https://www.ghproxy.cn/https://grafana.github.io/helm-charts/releases/download/loki-distributed-0.72.0.tgz

# 解压chart资源
tar xf loki-distributed-0.72.0.tgz
cd loki-distributed
# 修改values.yaml文件,自定义需求。

配置

loki:
  schemaConfig:
    configs:
    - from: 2020-09-07		# 此时间后的日志数据存储方案使用本策略,下方的schema: v11通过不同版本号来进行区分,此项多次配置,系统达到时间后可以自动切换。
      store: boltdb-shipper
      object_store: aws		# 更改项,对象存储配置选择为aws存储,此处需符合官方规定的方案。
      schema: v11
      index:
        prefix: loki_index_
        period: 24h

  storageConfig:
    boltdb_shipper:
      shared_store: aws		# 更改项,chunk存储所使用的为aws方式
      active_index_directory: /var/loki/index
      cache_location: /var/loki/cache
      cache_ttl: 48h
    # aws块内容为新增内容,用于表明aws的连接方式及配置。
    aws:
      s3: http://loki:loki123456@192.168.15.11:9000/loki
      s3forcepathstyle: true

  ## 修改structuredConfig,新增ingester部分内容
  structuredConfig: 
    ingester:
      max_transfer_retries: 0
      chunk_idle_period: 1h
      chunk_target_size: 1536000
      max_chunk_age: 1h

ingester:
  replicas: 3		# 副本,调整为3,自行选择
  maxUnavailable: 1 	# 副本调整后,需要调整最大不可能的副本数,一般填写为副本数的1/3
  persistence:
    enabled: true		# 启用持久化存储,将index数据存储于此前已创建的nfs为基础的storageclass中
    inMemory: false
    claims:
      - name: data
        size: 20Gi
        storageClass: nfs-storage	# 需要和storageclass的名称一致。
distributor:
  replicas: 3
  maxUnavailable: 1
querier:
  replicas: 3
  maxUnavailable: 1
  persistence:
    enabled: true
    size: 20Gi
    storageClass: nfs-storage
ingress:
  enabled: true
  annotations: 
	# 关于ingress配置的认证方式,basic-auth需要手动提前配置,如何配置可以参考:http://my.conficker.space:33333/archives/ingressnginx-chang-yong-li-zi中常用示例-->基本认证的内容
    nginx.ingress.kubernetes.io/auth-type: basic
    nginx.ingress.kubernetes.io/auth-secret: basic-auth
    nginx.ingress.kubernetes.io/configuration-snippet: |
      proxy_set_header X-Scope-OrgID $remote_user;
  hosts:
    - loki.conficker.space	# 域名随便写了一个,可以通过修改hosts文件来访问。
gateway:
  # 使用ingress后,可以关闭gateway
  enabled: false

安装

helm install -n logging loki .

查看所有pod启动正常后,可以通过浏览器查看服务是否正常(安装promtail后)

访问:loki.conficker.com/loki/api/v1/labels,需要输入上方定义的认证账号和密码(ingress annotation中的内容)

如果status为success即为正常

Helm部署Promtail

# 下载chart
# 因为网络原因,直接使用代理下载
wget https://ghproxy.com/https://github.com/grafana/helm-charts/releases/download/promtail-6.15.1/promtail-6.15.1.tgz
tar xf promtail-6.15.1.tgz
cd promtail

# 修改values.yaml配置
configmap:
  enabled: true
config:
  clients:
    - url: http://loki-loki-distributed-distributor:3100/loki/api/v1/push

# 安装
helm install -n logging promtail .

收集k8s Pod日志配置中修改

Promtail配置文件,对格式进行调整,保持grafana和控制台格式一致。

位置:.config.snippets.pipelineStages

  snippets:
    pipelineStages:
      - json:
          expressions:
            output: log
            stream: stream
            timestamp: time
      - labels:
          stream:
      - timestamp:
          source: timestamp
          format: RFC3339Nano
      - output:
          source: output
    common:

Helm部署Grafana

# 下载chart
helm pull grafana/grafana 
tar xf grafana-6.59.1.tgz
cd grafana
# 修改values.yaml,修改内容如下
ingress:
  enabled: true
  hosts:
    - grafana.conficker.space
persistence:
  type: pvc
  enabled: true
  storageClassName: nfs-storage
  accessModes:
    - ReadWriteOnce
  size: 20Gi

# 安装
helm install -n logging grafana .

安装完成后访问grafana.conficker.space(提前配置hosts解析)

grafana 连接 loki

因为grafana和loki都安装在同一个命名空间内,且loki已经通过service进行暴露,可以直接使用内部dns地址进行访问,添加loki数据源时,使用:http://loki-loki-distributed-querier:3100即可,此处不需要使用认证,因为loki自身服务并未开启auth认证功能.

Footnotes

  1. 部署

    环境说明

    ip主机名数据路径操作系统版本Minio版本
    10.2.3.23vm19-node23/data/miniocentos7.5RELEASE.2022-08-13T21-54-44Z
    10.2.3.24vm19-node24/data/miniocentos7.5RELEASE.2022-08-13T21-54-44Z
    10.2.3.25vm19-node25/data/miniocentos7.5RELEASE.2022-08-13T21-54-44Z
    10.2.3.26vm19-node26/data/miniocentos7.5RELEASE.2022-08-13T21-54-44Z
    • 分布式Minio至少需要4个节点
    • 如果资源不够,可以采用两个节点每个节点启动两个实例的方式来实现四节点的集群,仅用于测试环境
    • 生产环境建议最少4节点

    环境准备

    #所有节点执行下列操作
    # 配置时间同步,配置时间同步的方式不做讲述
    # 创建数据目录
    mkdir -p /data/minio
    # 创建程序存放路径
    mkdir -p /usr/local/minio
    # 下载minio程序包
    wget -P /usr/local/minio https://dl.min.io/server/minio/release/linux-amd64/minio
    # 修改系统最大文件数
    echo "*   soft    nofile  65535" >> /etc/security/limits.conf
    echo "*   hard    nofile  65535" >> /etc/security/limits.conf
    

    配置启动Minio启动脚本

    vim /usr/local/minio/minio_run.sh

    • MINIO_ACCESS_KEY:用户名,长度最小是5个字符
    • MINIO_SECRET_KEY:密码,密码不能设置过于简单,不然minio会启动失败,长度最小是8个字符
    • --config-dir:指定集群配置文件目录
    • 所有节点均需配置
    #!/bin/bash
    #export MINIO_ACCESS_KEY=Admin
    #export MINIO_SECRET_KEY=Admin1234!
    # 新版本使用MINIO_ROOT_USER和MINIO_ROOT_PASSWORD来配置账号密码
    
    export MINIO_ROOT_USER=Admin
    export MINIO_ROOT_PASSWORD=Admin1234!
    
    /usr/local/minio/minio server --config-dir /usr/local/minio \
    http://10.2.3.23/data/minio \
    http://10.2.3.24/data/minio \
    http://10.2.3.25/data/minio \
    http://10.2.3.26/data/minio \
    

    配置minio.service

    cat > /usr/lib/systemd/system/minio.service <<EOF
    [Unit]
    Description=Minio service
    Documentation=https://docs.minio.io/
    
    [Service]
    WorkingDirectory=/usr/local/minio
    ExecStart=/usr/local/minio/minio_run.sh
    
    Restart=on-failure
    RestartSec=5
    
    [Install]
    WantedBy=multi-user.target
    EOF
    

    授权

    chmod u+x /usr/local/minio/minio
    chmod u+x /usr/local/minio/minio_run.sh
    chmod u+x /usr/lib/systemd/system/minio.service
    

    启动服务

    systemctl daemon-reload
    systemctl enable --now minio
    systemctl status minio -l
    

    测试服务是否正常

    分别访问四个节点(http://10.2.3.23-26:9000),账号密码为minio_run.sh脚本中指定的账号密码。

    Nginx代理

    在生产环境中,一般需要使用Nginx或者Haproxy进行反代+负载均衡来使用Minio,本文采用Nginx方式。
    在10.2.3.23上面安装nginx并进行配置:
    安装nginx

    wget http://nginx.org/download/nginx-1.22.0.tar.gz
    tar xzvf nginx-1.22.0.tar.gz
    cd nginx-1.22.0
    yum install -y wget gcc gcc-c++ make pcre pcre-devel zlib zlib-devel openssl openssl-devel
    ./configure --prefix=/usr/local/nginx
    make && make install
    echo 'export PATH=$PATH:/usr/local/nginx/sbin/' >> /etc/profile
    source /etc/profile
    nginx -t
    # 配置nginx.service
    cat > /usr/lib/systemd/system/nginx.service << EOF
    [Unit]
    Description=nginx
    After=network.target
    [Service]
    Type=forking
    ExecStart=/usr/local/nginx/sbin/nginx
    [Install]
    WantedBy=multi-user.target
    EOF
    # 启动nginx
    systemctl daemon-reload && systemctl enable --now nginx && systemctl status nginx
    

    配置nginx
    修改nginx配置文件/usr/local/nginx/conf/nginx.conf
    关键配置如下:

    worker_processes  1;
    events {
        worker_connections  1024;
    }
    
    http {
        include       mime.types;
        default_type  application/octet-stream;
        sendfile        on;
        keepalive_timeout  65;
        upstream minio{
            server 10.2.3.23:9000;
            server 10.2.3.24:9000;
            server 10.2.3.25:9000;
            server 10.2.3.26:9000;
        }
        server {
            listen       80;
            server_name  localhost;
            location / {
                    proxy_pass http://minio;
                    proxy_set_header Host $http_host;
                    client_max_body_size 1000m;
            }
            error_page   500 502 503 504  /50x.html;
            location = /50x.html {
                root   html;
            }
        }
    }
    

    测试Nginx

    访问 http://10.2.3.23查看是否正常

  2. 本地安装loki

    # 下载loki二进制文件
    cd /usr/local/src/ && wget https://github.com/grafana/loki/releases/download/v2.9.1/loki-linux-amd64.zip
    
    # 解压
    tar xvzf loki-linux-amd64.zip
    
    # 授权
    chmod +x loki-linux-amd64
    mv loki-linux-amd64 /usr/bin/loki
    
    # 编写loki service脚本
    vim /etc/systemd/system/loki.service
    [Unit]
    Description=Loki service
    After=network.target
    
    [Service]
    Type=simple
    ExecStart=/usr/bin/loki -config.file /etc/loki/config.yml
    # Give a reasonable amount of time for the server to start up/shut down
    TimeoutSec = 120
    Restart = on-failure
    RestartSec = 2
    
    [Install]
    WantedBy=multi-user.target
    
    
    # 创建loki配置文件
    mkdir /etc/loki
    vim /etc/loki/config.yml
    
    auth_enabled: false
    
    server:
      http_listen_port: 3100
      grpc_listen_port: 9096
    
    common:
      instance_addr: 172.21.61.21
      path_prefix: /tmp/loki
      #storage:
      #  filesystem:
      #    chunks_directory: /tmp/loki/chunks
      #    rules_directory: /tmp/loki/rules
      replication_factor: 1
      ring:
        kvstore:
          store: inmemory
    
    query_range:
      results_cache:
        cache:
          embedded_cache:
            enabled: true
            max_size_mb: 100
    
    schema_config:
      configs:
        - from: 2020-10-24
          store: boltdb-shipper
          object_store: aws
          schema: v11
          index:
            prefix: index_
            period: 24h
    storage_config:
      # 将chunk文件存储于minio集群的loki桶内,chunk文件的生命周期由桶进行管理
    
      aws:
        # Note: use a fully qualified domain name, like localhost.
        # full example: http://loki:supersecret@localhost.:9000
        s3: http://loki:1ZEPLaztqSMcCSICXO4f@172.21.61.5:19000/loki
        s3forcepathstyle: true
      boltdb_shipper:
        active_index_directory: /loki/boltdb-shipper-active
        cache_location: /loki/boltdb-shipper-cache
        cache_ttl: 24h         # Can be increased for faster performance over longer query periods, uses more disk space
        shared_store: aws
    ruler:
      alertmanager_url: http://172.21.61.24:9093
    
    # By default, Loki will send anonymous, but uniquely-identifiable usage and configuration
    # analytics to Grafana Labs. These statistics are sent to https://stats.grafana.org/
    #
    # Statistics help us better understand how Loki is used, and they show us performance
    # levels for most users. This helps us prioritize features and documentation.
    # For more information on what's sent, look at
    # https://github.com/grafana/loki/blob/main/pkg/usagestats/stats.go
    # Refer to the buildReport method to see what goes into a report.
    #
    # If you would like to disable reporting, uncomment the following lines:
    #analytics:
    #  reporting_enabled: false
    
    
    # 存储桶的权限配置如下:
    {
        "Version": "2012-10-17",
        "Statement": [
            {
                "Sid": "LokiStorage",
                "Effect": "Allow",
                "Principal": {
                    "AWS": [
                        "arn:aws:iam::<account_ID>"
                    ]
                },
                "Action": [
                    "s3:ListBucket",
                    "s3:PutObject",
                    "s3:GetObject",
                    "s3:DeleteObject"
                ],
                "Resource": [
                    "arn:aws:s3:::<bucket_name>",
                    "arn:aws:s3:::<bucket_name>/*"
                ]
            }
        ]
    }
    
    # 启动服务
    
    systemctl daemon-reload && systemctl enable --now loki
    

    此时可以通过lokicli进行访问测试:
    文档参考地址:https://grafana.com/docs/loki/latest/query/logcli/

    通过grafana连接loki,需要注意grafana的版本,使用2.9.1的loki版本时,通过grafana 6、grafana 7访问连接loki,均出现可以连接,但没有找到标签的报错。通过grafana 9及其以上版本,连接成功

星霜荏苒 居诸不息